
Ghost Mannequin Photography: Traditional Methods and AI Workflows
PAGE
By PAGE Editor
In a ghost mannequin shirt photo, the neckline often catches your eye first: it holds its shape and depth, while the mannequin has disappeared.
That simple-looking image takes work. Shoulders, body and hidden inner-collar details all need to make sense, especially with complex clothing.
Traditional photography uses shooting and compositing; AI can generate a dimensional view from existing photos. Understanding each method's source requirements helps brands choose an approach.
What Ghost Mannequin Photography Shows
Ghost mannequin photography, also called invisible mannequin photography, gives clothing a shape similar to how it looks when worn while removing the visible person or display form.
The resulting image can show neckline openings, shoulder lines, sleeves and body construction with the product as the focus. It is one option for brands that want consistent backgrounds and framing across a collection.
A dimensional appearance is not a measurable 3D model. One image cannot supply every angle, establish actual sizing or demonstrate fit across different body types. Shoppers still need back views, detail photos and measurements to understand the whole garment.
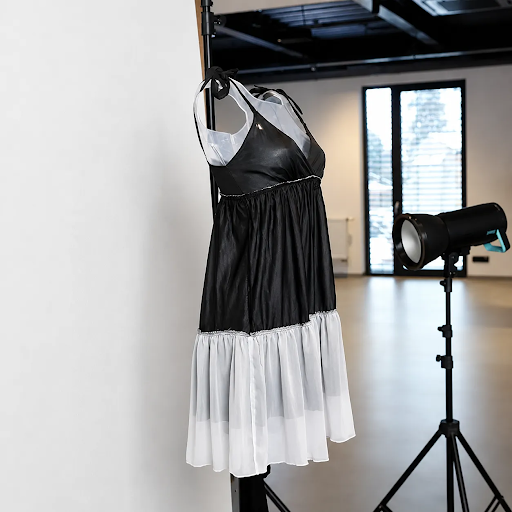
Studio setup illustration: a black-and-white dress on a clear display form. This is a setup view, not a finished ghost mannequin image.
How the Traditional Photography Method Works
Start with the garment and mannequin. Choose a form that supports the clothing appropriately at the shoulders, chest and waist. Smooth wrinkles according to the care label and check buttons, zippers and accessories.
Keep the silhouette natural. Clips may help hold fabric in place, but avoid pulling a loose style into a fitted shape or implying a cut the product does not have.
Set up the lighting and camera, then photograph a clear overall front view. Add back and side views according to the plan. Keep camera height, distance, lighting and garment position as consistent as possible across related shots; this makes alignment during editing easier.
Next, identify what will become visible when the mannequin is removed. A shirt may need an inner-collar photo. An open jacket may need lining and the inside of the front opening. Wide cuffs or unusual hems may require additional interior shots.
Removable mannequin parts and clear forms can expose some areas, but they do not eliminate every need for extra photography. Build a shot list around the openings visible in the final view. That helps prevent discovering missing material after the shoot is over.
How the Invisible Mannequin Effect Is Created in Editing
Start with a sharp main photo at a suitable angle. Mask the garment, remove the mannequin, and fill interior areas with corresponding source images.
For an inner collar, match the insert's size, angle and curve to the neckline in the main image. Check the label, seams and fabric direction, then adjust local light and shadow so the opening has believable depth.
The same principle applies to cuffs, lining and hems: each composite area needs real source material. Where a print or plaid crosses a seam, inspect how the pattern connects. Combining two photographs should not introduce a misplaced stripe or mismatched panel.
Finish by cleaning up edges, background remnants and broken shadows. Pale edges on white clothing, fuzzy fibers, lace and translucent fabric often need particularly careful masking.
For a closer look at these steps, see these ghost mannequin photo editing techniques. Removing the background separates visible areas from their surroundings; rebuilding clothing hidden behind a mannequin also requires information about the garment's interior. Planning for both jobs makes the editing requirements clearer.
How AI Ghost Mannequin Workflows Differ
An AI workflow can begin with several types of source photo. The starting image determines what needs the most attention during review.
With a flat lay or hanger shot, the task is to create a dimensional presentation from a flatter starting point. With a mannequin or model photo, the task includes retaining garment features while producing a view without a visible wearer. Even in the second case, review the result as a generated image; the process does not guarantee that every garment pixel stays unchanged.
Using Snappyit's ghost mannequin workflow, for example, you can upload a clear, complete clothing photo, choose available category and output settings, then compare the generated result with the actual product.
If a separate flat lay presentation would also serve the listing, Snappyit's Flat Lay tool provides another image option. Keep the original product photo as the reference throughout, including when moving between generated formats.
AI can reduce some manual image construction, but it may infer regions absent from the source. A pressed-down inner collar, a side panel hidden by a model's arm or an opening covered by a hanger can become newly generated content. Additional reference photos help a reviewer confirm those areas; a plausible appearance alone is not enough.
The two workflows can be outlined this way:
Traditional: Prepare garment and mannequin → Photograph exterior views → Capture interior details → Mask and composite → Check against the product → Export.
AI: Select and prepare the source → Add review references as needed → Set options and generate → Check against the product → Correct, retry or reshoot → Export.
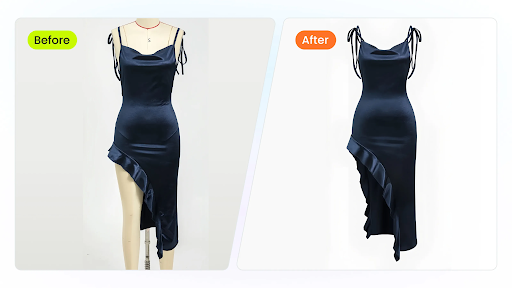
A separate navy satin dress with an asymmetric design: mannequin source image, left, and AI-generated ghost mannequin result, right. This is a different garment from the studio setup above.
Traditional and AI Workflows: What Changes in Practice?
Compare the source material you already have, the control needed over construction details and the available ways to make corrections.
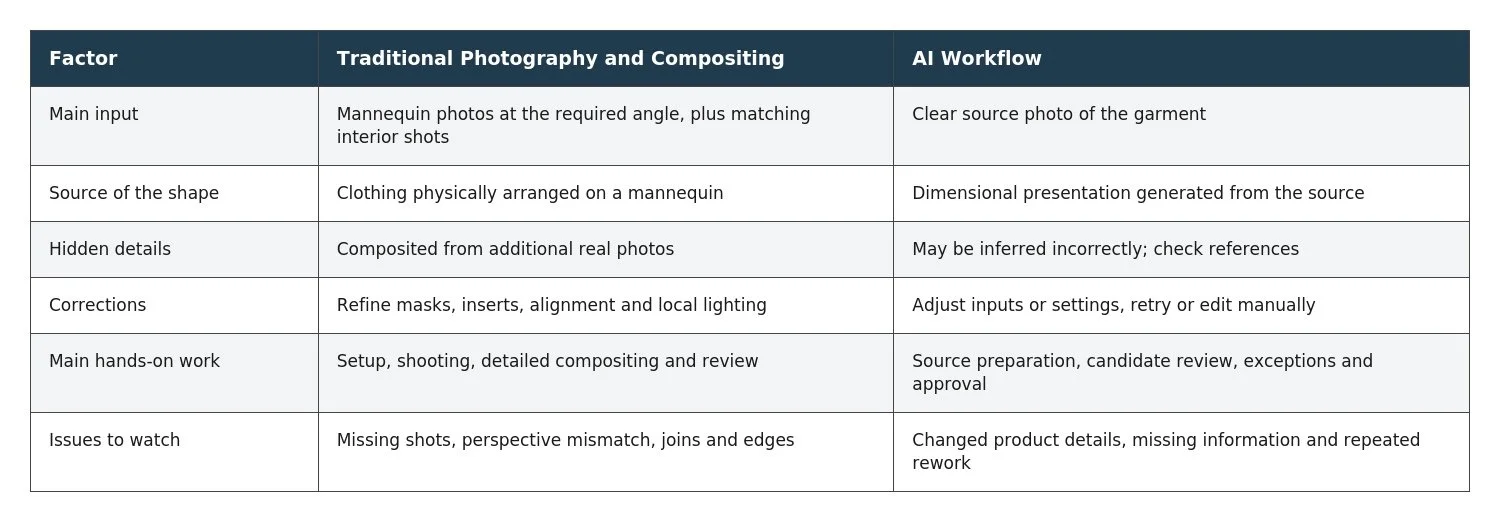
Traditional editing gives an editor room to adjust individual areas, while still depending on source quality and skill. AI can turn existing photos into another presentation, but each garment's result needs approval. The method's name alone does not tell you which finished image is more accurate.
Compare costs using the same deliverable: add photography, tool fees, hands-on work, retries and review, then divide by the number of approved, usable images. Equipment and subscription costs may be allocated differently for a one-time launch and ongoing high-volume production. A meaningful price or speed ranking requires a test under comparable conditions.
Garment Details That Need Extra Attention
A garment's design determines how detailed its references should be. Two products in the same broad category can need very different preparation.
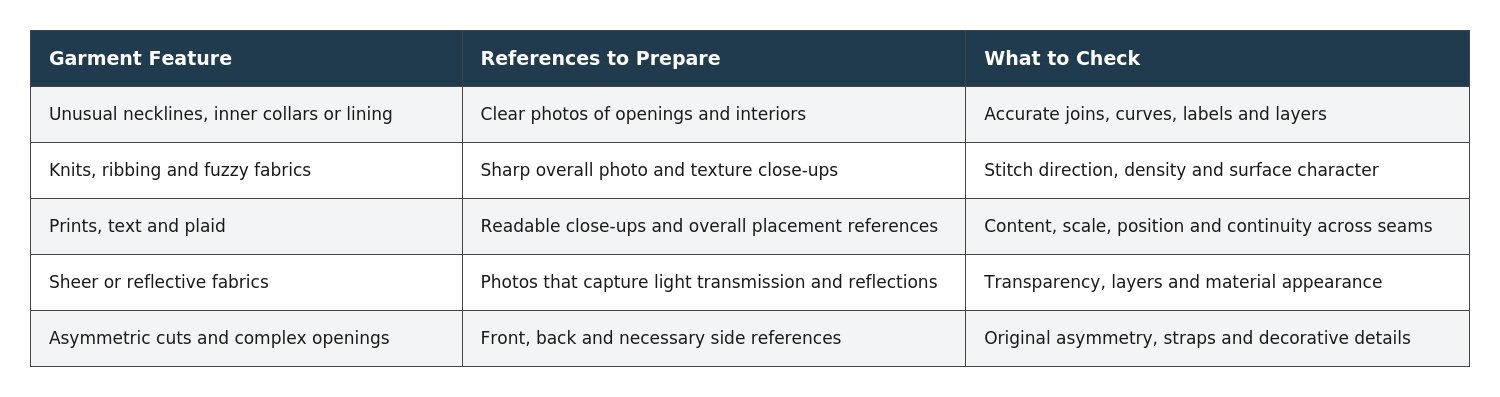
Check both the complete image and enlarged details. Natural lighting differences can change highlights and shadows without changing the design a shopper understands from the photo.
If only part of a source is clear, it may still support a detail view. Photograph missing areas before continuing generation or compositing.
How to Document Your Own Garment Case Study
The navy satin dress above provides a concrete visual example. Both views show a draped neckline, tie straps and a diagonal ruffled opening. The result removes the visible dress form and changes some folds and highlights. Those changes identify areas for closer review; the comparison alone does not establish that every construction detail is accurate.
To document a complete case, start with the source material and intended use. A clear flat lay can support an AI test; mannequin photos and matching interior shots can support traditional compositing. Record why the chosen route fits the garment.
Save originals, identify essential structures, and record steps and versions. Review the neckline, sleeves, pattern, color and interior areas, noting reasons for approval or rework.
Case-study log template: Use the template below to document your own garment, workflow, review findings, and final images.
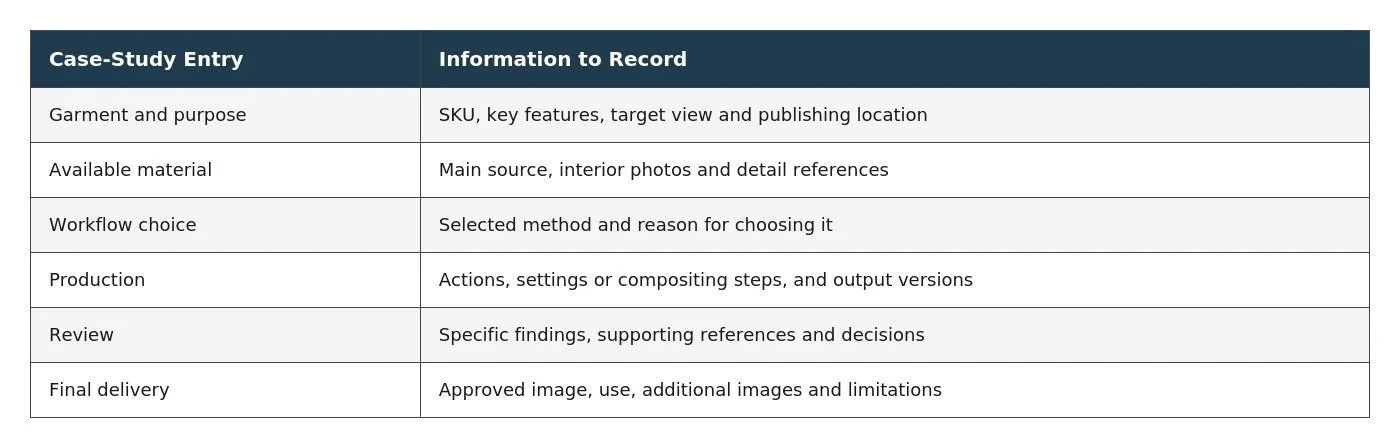
One complete case using a single method can explain preparation and review requirements. Comparing final cost, time and results across both methods requires the same garment, delivery goal and clearly recorded conditions.
Choose a Method for Your Next Shoot
Assign garments to workflows based on the material available and the details that need control.
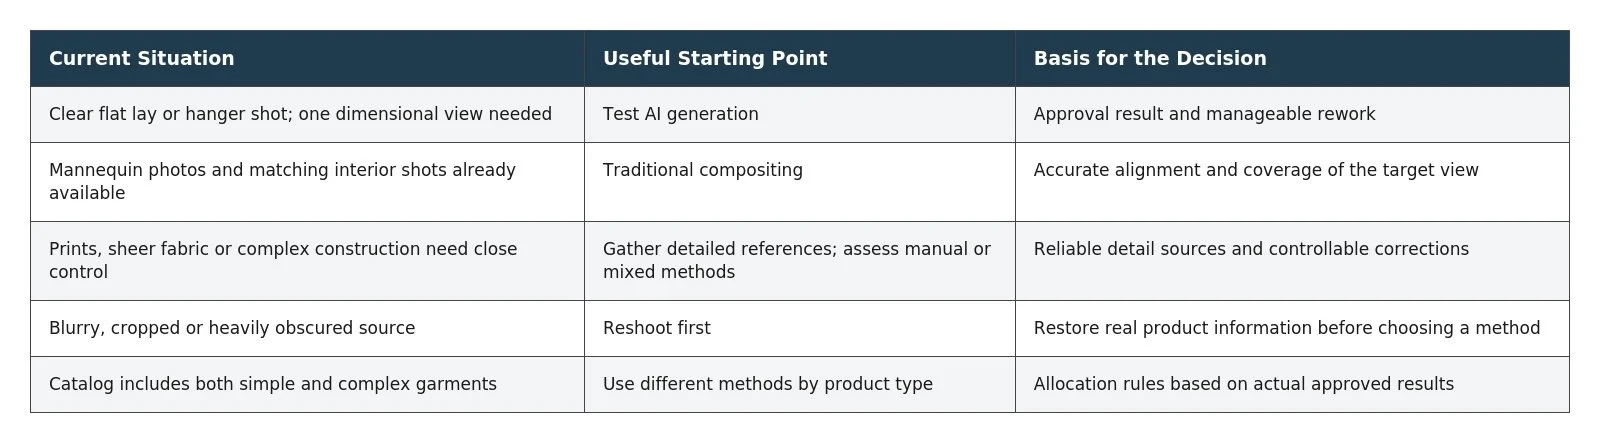
A useful ghost mannequin image explains the garment clearly and accurately. Consider the photos you have, the clothing's construction and the final use together, then use the results to refine the workflow for the next batch.
HOW DO YOU FEEL ABOUT FASHION?
COMMENT OR TAKE OUR PAGE READER SURVEY
Featured
A late-night habit loop explains why resolve fades after dark, and how small environmental shifts beat white-knuckle discipline every time.