
How to Turn a Child’s Drawing into a 3D Print: 5 Design Steps
PAGE
By Finixio Digital
A practical, design-led method for translating a sketch into an object that stands, connects, holds, and survives everyday handling—without erasing the child’s original idea.
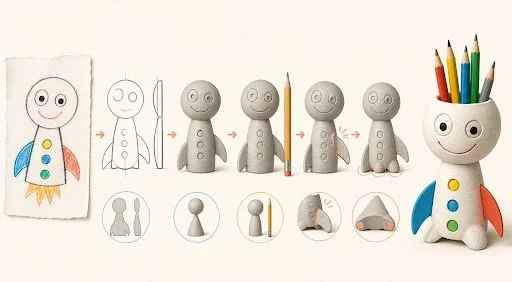
Illustration: one child’s rocket-creature sketch moves through view, volume, scale, connection, and balance studies before becoming a printable pencil holder. No printer product is depicted
To turn a child’s drawing into a 3D print, do not trace every line. First identify the features that make the drawing recognizable. Then translate those features into five things a physical object needs: a clear view, three-dimensional volume, real-world scale, dependable connections, and stable contact with the ground. Test the most uncertain feature before printing the complete model.
A drawing can ignore gravity with complete confidence. A robot stands on needle-thin toes, a castle floats on clouds, and a creature’s enormous head balances on a curling line. That freedom is part of its expression. Making the idea physical should not mean correcting the imagination. It means deciding which marks become thickness, support, connection, proportion, or color.
The interesting work happens in those decisions. A printer can reproduce geometry, but it cannot decide whether a crooked smile should be a groove, a raised feature, or simply a painted mark. It cannot know whether a tail is decoration, a handle, or a third point of balance. Those judgments belong to the young designer.
Step 1: Choose the View That Makes the Drawing Recognizable
Most drawings present one privileged view. Before opening a modeling tool, ask what another person must recognize first. Is it the rocket-shaped outline, the creature’s face, a row of windows, or an exaggerated fin?
Circle three identity features and rank them. This prevents every pencil mark from becoming geometry and gives later tradeoffs a clear reference. If stability requires a wider base, the designer can judge whether that change preserves or weakens the feature that matters most.
Then draw at least one additional view. A front-facing rocket creature may look complete, but the side study must answer how deep the body is, where the arms attach, and whether a pencil opening passes through the head or sits behind it. The second view does not decorate the concept. It exposes decisions that the first drawing was never required to make.
Step 2: Turn 2D Lines into 3D Volumes
One line can represent an edge, a color boundary, a strand of hair, a surface change, or an entire arm. A printable object needs volume. Classify each important line as one of four roles:
Boundary: the outer contour of a body or part.
Raised feature: a brow, ridge, scale, or emblem that sits above a surface.
Recessed feature: a smile, panel line, or pattern cut into a surface.
Graphic feature: a mark better preserved through color or finishing than separate geometry.
Build the largest body volumes first using a small vocabulary of boxes, cylinders, spheres, and rounded forms. Add the functional volume next—the cavity that holds pencils, the slot that accepts a card, or the base that meets a game board. Expression comes last.
This order protects the project from becoming a fragile collection of details before it has a body. It also clarifies what can be simplified without losing the drawing’s personality.
Step 3: Set Real-World Scale and Dimensions
A sketch has no automatic relationship to a hand, desk, shelf, game board, or pencil. Choose one real reference and measure it. If the object is a pencil holder, measure several pencils and decide how many must fit. If it is a game token, measure the board square and compare it with a piece that already feels comfortable to pick up.
Record only four groups of dimensions:
Overall envelope: the maximum height, width, and depth available.
Functional fit: the opening, slot, or clearance that accepts another object.
Handling scale: the smallest feature a person must see, grip, or distinguish.
Material presence: enough thickness for the selected feature to exist as a durable form.
Before committing to CAD, cut a paper silhouette or cardboard profile at full size. Put it on the desk and hold it at the intended viewing distance. A two-minute mock-up may reveal that the character blocks a notebook, that the opening is too high for short pencils, or that the object dominates the space.
The point is not precision for its own sake. Scale gives the drawing a relationship with a real user.
Step 4: Strengthen Joints Without Losing the Style
Shapes that overlap convincingly on a screen may meet through a tiny contact point in the physical model. Inspect every arm, ear, fin, wheel, hook, and handle. Trace the path from that feature into the main body. A connection that narrows sharply at the joint may fail during printing, removal, assembly, or play.
Strengthening a connection does not require flattening the visual gesture. A thin curling tail can become a shallow raised curve against the body. An arm can touch the torso at a second point. A fin can receive a broad root instead of meeting the rocket at a knife edge.
The useful question is not “How do we make this part thicker?” It is “How can this material carry the same gesture?” That wording keeps engineering in service of the drawing rather than replacing it.
Step 5: Design for Balance and Gravity
Find the lowest contact area and imagine the object’s mass dropping through it. A heavy top over a narrow base may tip. Decorative parts that project far from the body create leverage. Widening the base is one answer, but it is not the only one: lower the body, move mass inward, change the pose, or let a tail become a deliberate third support.
Test balance before the final print with blocks, modeling clay, cardboard, or a low-detail prototype. Put the object where it will actually be used and add whatever it must hold. Function changes the load. An empty pencil holder may stand perfectly and tip as soon as the tallest pencil is inserted.
Ask the child to describe the tradeoff. “The wider feet make it steadier but less like it is flying” is a design observation. It gives the next version two qualities to balance rather than one defect to eliminate.
Compare small studies instead of betting on one full model
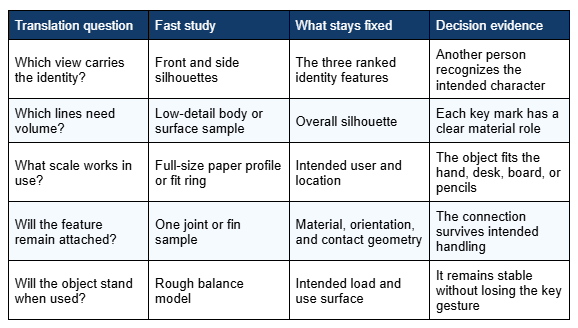
Do not ask a single large print to solve every translation at once. Make small studies from the same drawing:
A silhouette or profile that protects the identity.
A low-detail body that tests volume and scale.
A connection sample for the riskiest feature.
A rough balance model with the intended load.
A surface sample for one expressive detail.
The child should handle the studies and choose which tradeoff protects the original idea best. A wider base may improve stability but make the creature feel heavy. A thicker tail may survive play but change the pose. A smaller head may balance well but lose the expression that made the drawing recognizable.
These are not software mistakes. They are design choices made visible.
Follow one example through all five translations
Imagine a drawing of a rocket creature that will become a pencil holder. Its identity comes from an oversized round head, two uneven fins, and a curling smile.
The front view preserves those three features, while a side sketch establishes the body depth and pencil cavity. The round head becomes the main volume; the smile becomes a shallow recess rather than a separate strip. Several real pencils determine the opening and overall height. The fins receive broader roots where they meet the body. Finally, the body is lowered and the back fin touches the desk as a third support.
Notice what has not happened: an adult has not “fixed” the character into symmetry. The uneven fins remain because they carry the drawing’s identity. Only their connection has changed. The final object can disagree with the drawing’s geometry while remaining faithful to its intention.
Use guided tools without giving away the design
A blank professional CAD workspace can make a beginner spend more attention on navigation than on form. Guided modeling tools can reduce that cognitive load, but the standard is the same for any platform: the child must be able to understand and change the design instead of accepting a one-click result.
Before a meaningful edit, ask for a prediction. “If you widen the feet, what do you expect during the tip test?” “If the smile becomes a shallow groove, what changes in the printed surface?” The language connects a tool action with a physical consequence and keeps authorship visible.
Print the question, not the whole character
The first print does not need to contain the complete design. If pencil fit is uncertain, make a short ring with the proposed opening. If facial depth is the question, place three eye-and-mouth variations on a flat sample. If connection strength is uncertain, print one fin and a small section of the body.
Label the samples and keep the most informative pair: one that revealed the problem and one that improved it. That pair can show the designer’s reasoning more clearly than a shelf of finished characters. It also gives the child language for the final form: “The base is wide because the first version tipped,” not “because an adult preferred it.”
Separate creative ownership from operating responsibility
Children can own identity features, measurements, shape choices, colors, test verdicts, and revisions. Adults should own stable placement, material compatibility, file and setup review, supervision, maintenance, and all contact with heated or moving parts.
For families that want the hardware boundary to be equally clear, an enclosed 3D printer designed for young makers can separate the child’s design decisions from adult-managed equipment responsibilities. AOSEED X-MAKER JOY is one example. Families should still follow the current manual, use compatible materials, supervise printing, and keep maintenance and contact with heated or moving parts with an adult.
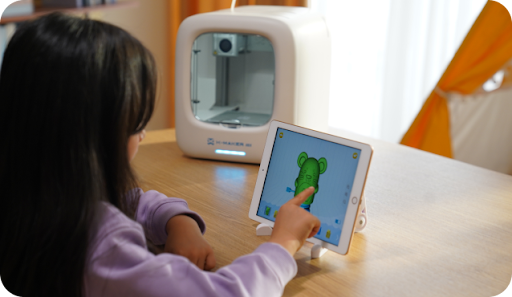
Official AOSEED X-MAKER JOY product image — shown exactly as supplied by AOSEED
Let the physical object answer back
Place the final object beside the original drawing. Ask which changes preserved the character, which solved material problems, and which tradeoff remains. The result may have shorter horns, thicker feet, a deeper body, or a tail attached at two points. Those differences are not evidence that the drawing was wrong. They are evidence that the idea crossed from one medium into another.
Imagination supplies the identity; design gives it a body. Young makers learn that fidelity is not copying every line. It is carrying the most important intention through five honest negotiations with depth, scale, connection, gravity, and use.
FAQs
Can any child’s drawing be turned into a 3D print?
Yes—most drawings can inspire a printable object, but not every mark should become separate geometry. The designer must decide which features carry the identity and which should become volume, a surface detail, color, support, or a simplified shape.
Does the drawing need front, side, and top views?
One additional view is often enough to expose the biggest unanswered questions for a beginner. More views help when the back, underside, opening, or connection is important. The goal is not professional drafting; it is making hidden assumptions discussable before modeling.
How can a design become stronger without losing the child’s style?
Preserve the gesture while changing how the material carries it. A thin tail can touch the body at a second point, a fin can receive a wider root, or a top-heavy pose can use the tail as a support. Judge every change against the ranked identity features.
Should the whole character be printed first?
Usually not. Print the uncertain question: a fit ring, facial-depth tile, risky connection, or low-detail balance model. Small studies shorten the feedback loop and make the reason for a revision easier for the child to explain.
Who should operate the 3D printer?
The adult should manage placement, compatible materials, file and setup review, supervision, maintenance, and contact with heated or moving parts. The child can own the drawing’s identity, dimensions, design choices, test verdict, and revision.
HOW DO YOU FEEL ABOUT FASHION?
COMMENT OR TAKE OUR PAGE READER SURVEY
Featured

Twelve times on input and twelve times on output is not a ratio you usually find inside a single vendor's lineup.